SSH on Windows
This guide will help you use SSH on Windows to connect to an SSH server. You'll get a similar experience to how SSH works on Linux on MacOS. No PuTTy or GUIs required, and you can even set it up so you don't have to re-type your private key password every time you connect.
This guide assumes you have installed Scoop and have a Linux machine running an SSH server—we'll need something to connect to. It also assumes that you're basically familiar with what SSH is all about and just want to know how to use it on Windows.
Install
If you're using Windows 10 version 1803 (April 2018) or above, a built-in win32-openssh has been installed in your system and been added to the system PATH. You can run
scoop which sshto locate the ssh that you're using, and you can chose to skip external openssh installation.
First, install SSH from a Powershell prompt:
scoop install openssh
Or, for the latest version of openssh:
scoop install win32-openssh
Connect with SSH using a password
Say you have a web server running at example.org. You should now be able to connect to it with
ssh username@example.org
Once you enter your password, you should be logged in to the remote server. Pat yourself on the back, you've connected with SSH from Windows! Easy, right?
Passwords are fine, but for extra security we can use a password-protected key instead. Let's set that up now.
Create a key for authentication
If you already have a private key (e.g. ~/.ssh/id_rsa) you can skip this step. If not, create a new private key like this (type text is in bold):
ssh-keygen
Generating public/private rsa key pair.
Enter file in which to save the key (/c/Users/username//.ssh/id_rsa): <b>[enter]</b>
Enter passphrase (empty for no passphrase): <b>your-super-secret-password</b>
Enter same passphrase again: <b>your-super-secret-password</b>
Your identification has been saved in /c/Users/username//.ssh/id_rsa.
Your public key has been saved in /c/Users/username//.ssh/id_rsa.pub.
The key fingerprint is:
d5:96:01:96:7a:63:25:93:a0:d6:65:0b:1a:a3:e7:05 username@COMPUTER
The key's randomart image is:
+--[ RSA 2048]----+
|      E o.=+.    |
|     . B ==o.o   |
|    . = o.o++    |
|     + ...+.     |
|      . So .     |
|                 |
|                 |
|                 |
|                 |
+-----------------+
If you used the default file as above, your private key will be created at ~/.ssh/id_rsa and your public key will be at ~/.ssh/id_rsa.pub.
Connect with an SSH key
Before we can connect to our server (e.g. example.org) with our SSH key, we need to authorize the key we'll be using by copying our public key to the remote server:
cat ~/.ssh/id_rsa.pub | ssh username@example.org 'mkdir -p ~/.ssh; cat >> ~/.ssh/authorized_keys'
Now try connecting again:
ssh username@example.org
This time, instead of being asked for your username password, you should be asked for the password for your private key.
Save your SSH key password in Windows Credential Manager
Now, every time you you connect with ssh username@example.org you'll be asked for the private key password.
You can use Pshazz to save your password in Windows Credential Manager.
scoop install pshazz
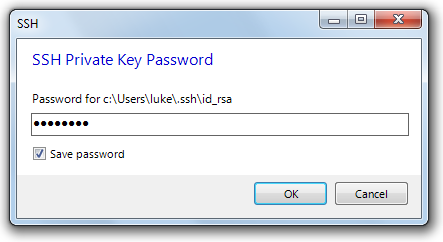
You should see a GUI dialog popup asking for your password. Enter it and check the 'Save password' box.
You should see a message like Identity added: /c/Users/username//.ssh/id_rsa (/c/Users/username//.ssh/id_rsa). Try connecting over SSH again:
ssh username@example.org
If everything went according to plan, you should be logged in without needing to enter your password. Hooray!
To see what happened, type:
ssh-add -l
The thumbprint for your SSH key should be shown. ssh-agent will try using this key whenever you use SSH now.
You should be able to see that your password is saved in Windows Credential Manager by running:
cmdkey /list:ssh:$home\.ssh\id_rsa
Each time you start a Powershell session, Pshazz will start up ssh-agent if it's not already running and add your key for you using the saved password.
Customising SSH settings
You might notice that your SSH sessions are timing out. To prevent this I like to add a ServerAliveInterval to my ~/.ssh/config (you might need to create this file if it doesn't exist):
Host *
  ServerAliveInterval 30
This will send a null packet to the remote server every 30 seconds to keep the connection alive.